


Imagine you’re driving at night on a quiet road. Suddenly, a deer darts across your path. You slam on the brakes, and your car safely comes to a stop.
Moments like these remind us how important it is to have brakes and lights that work perfectly.
Keeping these two crucial systems in top shape can save your life and prevent accidents.
That’s why I’m going to guide you through a complete brake and light inspection—one step at a time.
Why Brake and Light Inspections Matter
Before we get into the details, let’s think about what would happen if your car lights didn’t work at night or your brakes failed on a busy highway.
It’s scary, right? Proper inspections reduce the risk of such failures.
Regular checks ensure your car meets safety standards, especially if you’re in a state where vehicle inspections are required to renew registration.
Even if it’s not required, it’s still smart to inspect them every few months.
Now, let’s jump right into the inspection process.
1. Prepare Your Tools and Workspace
You don’t need to be a car expert or own a fancy toolbox to do a basic inspection. Just grab a few essentials:
- A flashlight
- A jack (if needed to check the brakes)
- A lug wrench (if you’re removing tires)
- A brake fluid tester (optional but helpful)
Find a level surface with good lighting. Safety comes first, so make sure your car is parked, the engine is off, and the emergency brake is engaged.
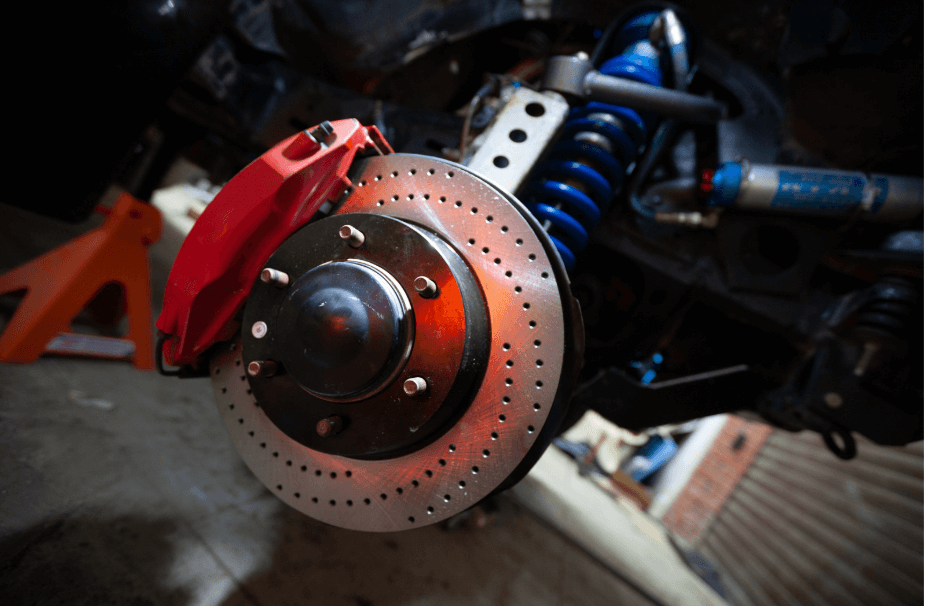
2. Inspecting Your Brake Pads and Rotors
Brakes work by applying pressure to pads and rotors to slow or stop your vehicle. Worn pads or damaged rotors can reduce braking performance. Here’s how you check them:
- Look through the wheel to see the brake pads. If they’re less than ¼ inch thick, they need replacing.
- If you can’t see the pads clearly, remove the tire. This will also give you a better view of the rotor.
- Examine the rotor surface. It should be smooth with minimal grooves. Deep grooves or cracks mean you might need to resurface or replace the rotor.
- Listen for any squealing or grinding sounds when braking. This often indicates worn pads or metal-on-metal contact.
3. Check Brake Fluid Levels
Brake fluid is like the lifeline of your brake system. Without enough clean fluid, your brakes won’t work efficiently.
- Locate the brake fluid reservoir under the hood. It’s usually marked with a symbol or labeled.
- Check that the fluid level is between the minimum and maximum lines. If it’s low, you may have a leak.
- Look at the fluid color. Fresh fluid is clear or light yellow. If it’s dark or cloudy, it’s time for a change.
4. Testing Brake Response
You don’t need a long stretch of road to test your brakes.
- Start your car and drive at a slow speed in a safe area.
- Apply the brakes gently and notice how the car responds. The braking should feel smooth, without vibrations or pulling to one side.
- If the pedal feels soft or spongy, there could be air in the brake lines.
5. Inspecting Exterior Lights
Your car’s lights help you see and be seen. Imagine driving in fog without working headlights—it’s a recipe for disaster. Here’s how to make sure all your lights are in good condition.
- Turn on each set of lights (headlights, taillights, brake lights, and turn signals).
- Have someone stand outside the car while you test each light, or park near a reflective surface.
- Check for any burned-out bulbs, flickering, or dim lighting. If a bulb is out, replace it immediately.
- Inspect the headlight covers. Cloudy or yellowed covers can reduce brightness. You can clean them with a headlight restoration kit.
6. Adjusting Headlight Aim
Misaligned headlights can either blind other drivers or fail to light the road properly. Here’s how to fix the aim:
- Park your car about 25 feet from a flat wall on a level surface.
- Turn on your headlights and mark the center of each beam on the wall with tape.
- Adjust the height and horizontal position using the screws or knobs near the headlight assembly. The beams should point slightly downward and to the right to avoid blinding oncoming traffic.
7. Check Turn Signals and Hazard Lights
Turn signals and hazard lights are essential for communicating with other drivers.
- Activate each turn signal and the hazard lights.
- Ensure all bulbs are blinking at a steady rate. If one blinks faster than normal, it’s a sign that a bulb may be out.
8. Inspect Brake Lights
Brake lights are crucial for letting other drivers know when you’re slowing down.
- Ask someone to stand behind the car while you press the brake pedal.
- Confirm that both left and right brake lights, as well as the center light, are working.
9. Check Backup Lights
Backup lights help other drivers and pedestrians know when you’re reversing.
- Shift into reverse (with the engine on but parking brake engaged) and check the rear lights.
- If they’re not working, check the bulbs and wiring.
10. Replace or Repair as Needed
If you’ve found any issues during the inspection, don’t wait to fix them. Replacing bulbs or brake pads is usually simple and affordable. For more complex problems like fluid leaks or electrical wiring issues, you might need a professional mechanic.
How Often Should You Inspect?
Ideally, you should inspect your brakes and lights every 3 to 6 months. However, if you notice warning signs like strange noises, reduced braking performance, or dim lights, don’t wait. Regular maintenance helps prevent costly repairs down the line.
FAQ
How do I know if my brake pads need to be replaced?
If your pads are less than ¼ inch thick or you hear squealing when braking, it’s time to replace them.
What should I do if my brake pedal feels spongy?
This could mean air is in the brake lines. You may need to bleed the brakes or check for fluid leaks.
Can I clean cloudy headlight covers at home?
Yes! Use a headlight restoration kit or a mix of baking soda and toothpaste for a quick fix.
Why is one of my turn signals blinking faster than the other?
This usually means a bulb is out. Check and replace any non-working bulbs.
How often should I check my brake fluid?
It’s a good idea to check your brake fluid every time you do an oil change or at least every six months.